
The plugin adds a Pay with Crypto payment method to VirtueMart. When a customer confirms an order, your store creates an invoice on your Payfim Gateway and sends the customer there to pay. The gateway notifies the store with a signed webhook and the order status is updated automatically.
Before you start, install your Payfim Gateway and add your wallets (see Install the gateway and Add wallets). Compatibility: VirtueMart 3.8 – 4.x · Joomla 3.10 / 4 / 5 · PHP 7.4 – 8.4.
- Install the plugin.
In the Joomla administrator open System > Install > Extensions (Joomla 3: Extensions > Manage > Install), choose the Upload Package File tab and drop
plg_vmpayment_payfim.zipon it. Joomla confirms Installation of the plugin was successful. You do not need to enable it manually - VirtueMart enables it when you create the payment method.
Joomla 5 extension installer after uploading the plugin. - Create the payment method.
Go to Components > VirtueMart > Shop > Payment Methods and click New. Enter the name customers will see, e.g. Pay with Crypto, and a short description (for example Pay with Bitcoin, USDT, Ethereum, Litecoin and more. You will choose your coin on the next screen.). Set Published to Yes, choose VM Payment - Payfim Crypto Payments in the Payment Method list and click Save.
Tip: Saving once is required: VirtueMart only shows the plugin's own settings (the Configuration tab) after the method has been saved with the plugin selected.
- Connect your gateway.
Open the Configuration tab. Enter your Gateway URL (e.g.
https://pay.yourstore.com) and your API key from the gateway admin (Integrations, starts withpf_live_). Click Test connection - you should see Connected to … with your enabled coins. Check the order statuses (defaults: awaiting payment Pending, paid Confirmed, expired Cancelled) and click Save.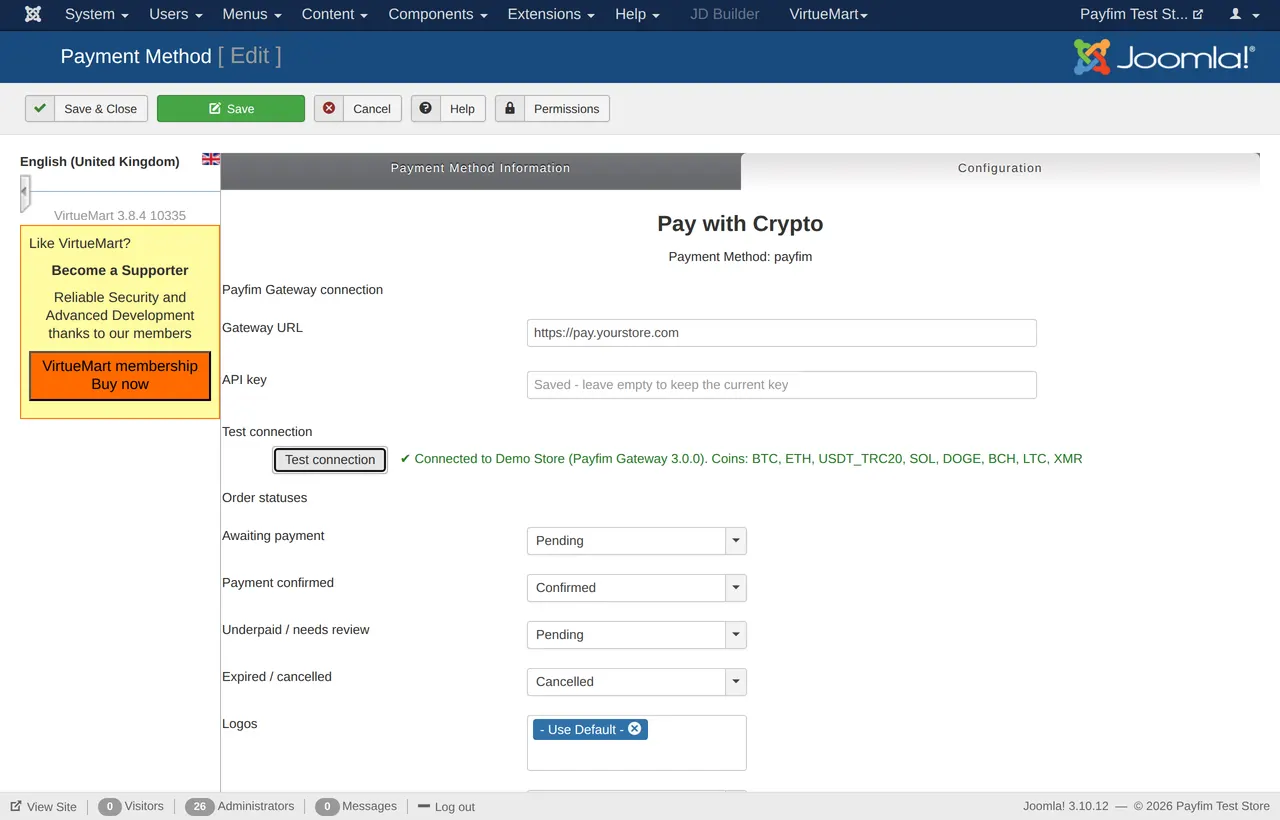
Payment method configuration with a successful connection test (VirtueMart 3.8 admin; the fields are identical in VirtueMart 4). Tip: The API key is stored encrypted and never shown again; leave the field empty to keep the saved key. VirtueMart has no built-in "on hold" status: if you want underpaid orders to stand out, create one in Configuration > Order Statuses and select it as Underpaid / needs review.
- Checkout.
Customers now see Pay with Crypto when they choose a payment method. After Confirm Purchase they are sent to your gateway, pick a coin and pay. When they come back, VirtueMart shows the thank-you page; the order is confirmed by the webhook - never by the redirect alone.

Payment method selection in the VirtueMart cart. - Paid orders.
When the payment is confirmed on the blockchain the order moves to Confirmed and the order history shows the coin, the amount received and the transaction hash. The Payment section of the order also lists the Payfim invoice ID. Underpaid invoices are never marked paid - the order gets a note Only X of Y COIN received so you can contact the customer.
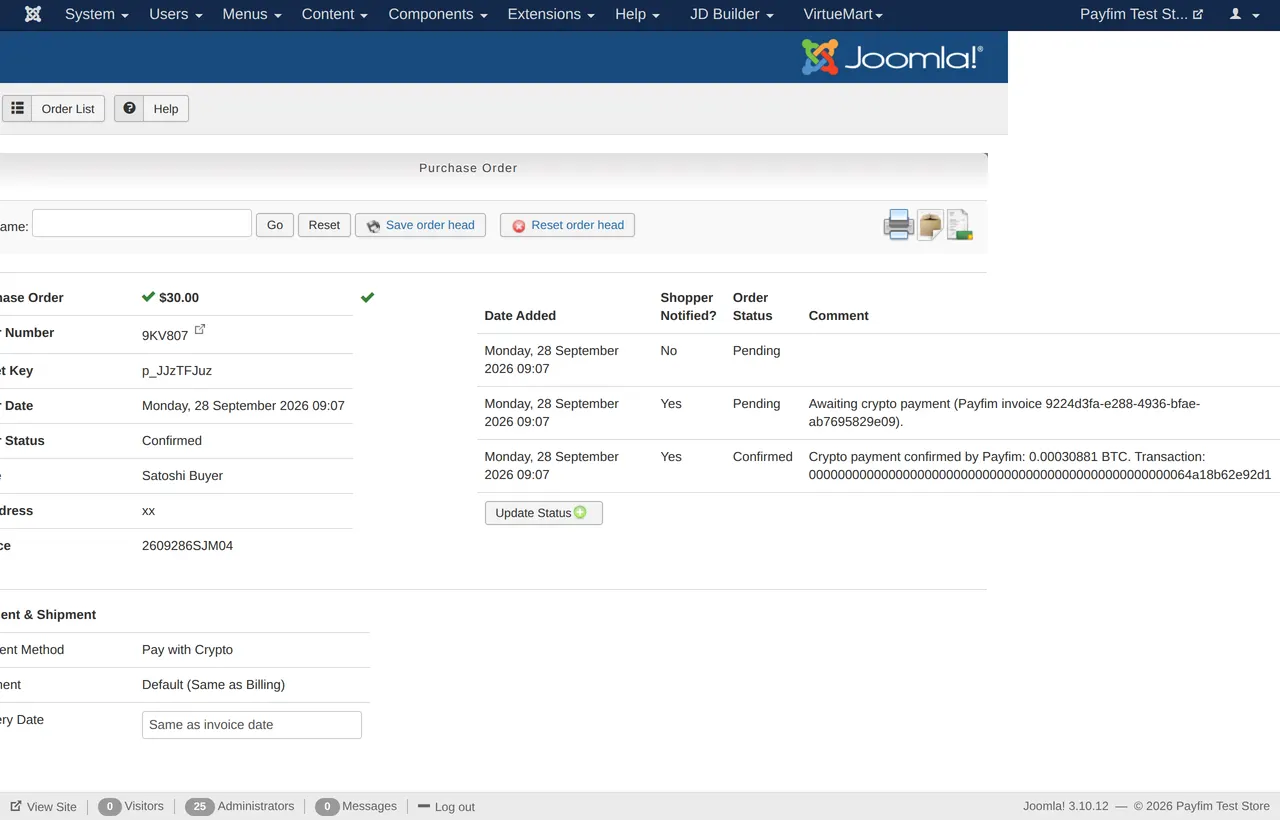
Order history after a confirmed crypto payment.
Troubleshooting
- "Crypto payment is temporarily unavailable" at checkout
- The store could not create the invoice. Open the payment method, click Test connection and check
administrator/logs/payfim-virtuemart.phpfor the exact gateway error (wrong URL, wrong API key, TLS problem). - Order stays Pending after paying
- The gateway could not reach the store's webhook. In the gateway admin open the invoice and check the webhook log. The URL looks like
https://yourstore.com/index.php?option=com_virtuemart&view=vmplg&task=notify&tmpl=component&pm=…and must be reachable from the gateway server (no maintenance mode / IP blocking). - Webhook log shows HTTP 401
- The API key saved in VirtueMart differs from the gateway's key, or the server clock is more than 5 minutes off. Re-enter the key and enable NTP time sync.
- The Configuration tab is missing
- Save the payment method once with VM Payment - Payfim Crypto Payments selected; VirtueMart then loads the plugin settings.
Get the VirtueMart Crypto Payment Plugin - the download includes an illustrated PDF version of this guide.